Contents:
- Understanding Your Options: The Five Main Extension Types
- Clip-In Extensions
- Tape-In Extensions
- Fusion (Bonded) Extensions
- Sew-In (Weave) Extensions
- Halo or Crown Extensions
- Complete Installation Guide: Step-by-Step Methods
- Installing Clip-In Extensions at Home
- Applying Tape-In Extensions Professionally and DIY
- Fusion Extension Application and Professional Requirements
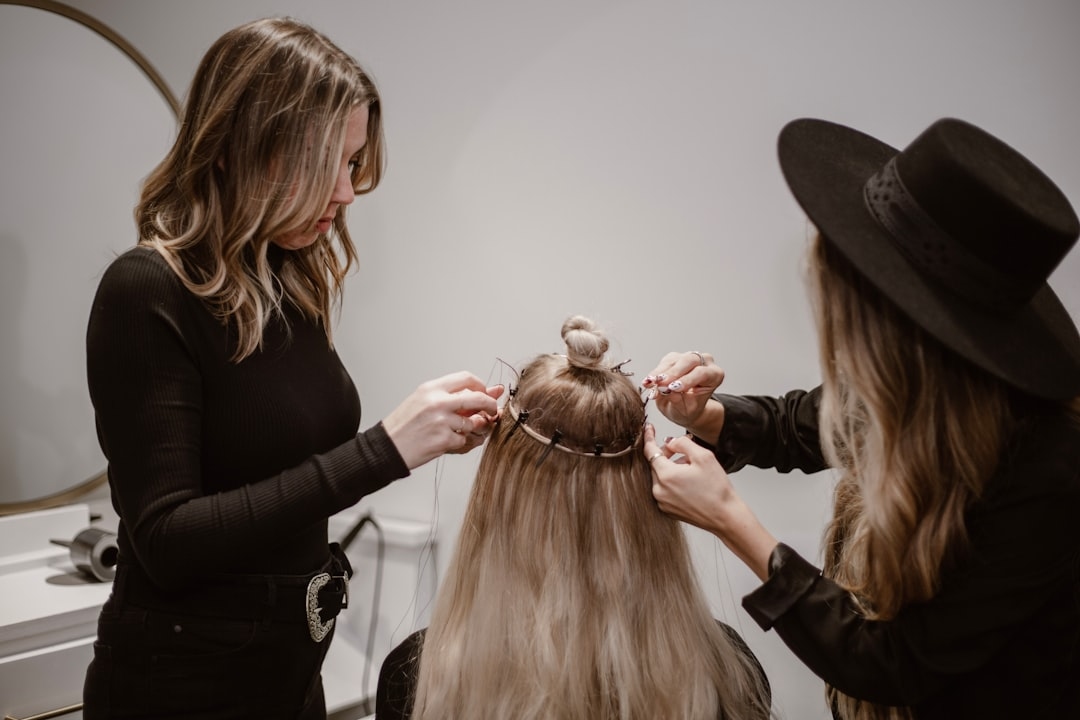
- Sew-In Installation and Braiding Preparation
- Pre-Installation Preparation: Setting Yourself Up for Success
- Hair Care in the Weeks Before Installation
- Scalp and Hair Cleansing Before Your Appointment
- Cost Breakdown: Complete Budget Guide for 2026
- Avoiding Common Installation Mistakes
- Poor Section Placement
- Insufficient Hair Preparation
- Inadequate Extension Density
- Incorrect Heat Tool Usage
- Aftercare: Making Your Extensions Last
- Daily Maintenance Routine
- Sleep and Activity Considerations
- Extension-Specific Restrictions
- Troubleshooting Common Installation Problems
- Extensions Slipping or Coming Loose
- Visible Attachment Points
- Matting and Tangling
- Breakage of Natural Hair
- Frequently Asked Questions About Hair Extension Installation
- How long does hair extension installation take?
- Can I install hair extensions myself, or do I need a professional?
- How often do I need to have extensions reapplied or repositioned?
- What’s the difference between human hair and synthetic extensions?
- Will hair extensions damage my natural hair?
- Moving Forward With Your Hair Extension Journey
Around 45% of women in the UK have tried hair extensions at some point, yet two-thirds report feeling anxious about the installation process itself. Getting hair extensions right transforms your appearance, but choosing and applying the wrong method can damage your natural hair or result in a disappointing finish. Understanding which installation technique suits your lifestyle, budget, and hair type removes the guesswork from this beauty investment.
Understanding Your Options: The Five Main Extension Types
Hair extensions come in five primary categories, each with distinct application methods, longevity, and cost implications. Your choice fundamentally shapes both the installation difficulty and the final result.
Clip-In Extensions
Clip-in extensions represent the most accessible entry point into hair extensions. Small plastic clips attach directly to sections of your hair, usually applied in 5-10 minutes. These temporary extensions suit those experimenting with length or volume before committing to permanent solutions. You can remove them each evening and reapply them whenever desired.
Cost estimate: A full head of clip-in extensions ranges from £30 to £150 depending on hair quality and density. Human hair clip-ins cost significantly more than synthetic alternatives but last 12-18 months with proper care.
Tape-In Extensions
Tape-in extensions attach using adhesive strips sandwiched between wefted sections of hair and your natural roots. Professional application takes 1-2 hours. These extensions feel lightweight and create a seamless blend when applied correctly. They typically last 6-8 weeks before needing repositioning as your natural hair grows.
Cost estimate: Salon application ranges from £200 to £400 for a full head. DIY tape-in kits cost £80-£150, though professional installation yields better results for first-timers.
Fusion (Bonded) Extensions
Fusion extensions use individual strands bonded to your hair with keratin or other adhesive compounds. Application requires 2-3 hours and demands real expertise. Each extension bonds to a small section of your natural hair, creating an incredibly secure attachment. These last 3-4 months before requiring removal and reapplication.
Cost estimate: Professional fusion application costs £400-£800 for a full head. High-end salons charge up to £1,200 depending on hair quality and technician experience.
Sew-In (Weave) Extensions
Sew-in extensions involve braiding your natural hair into cornrows, then sewing wefted hair onto those braids using a needle and thread. This method provides excellent security and lasts 6-10 weeks. Sew-ins work particularly well for curly or textured hair.
Cost estimate: Professional sew-in installation ranges from £150 to £400 depending on hair quality and braiding complexity.
Halo or Crown Extensions
Halo extensions sit on top of your head like a crown, secured by a transparent wire that sits at your hairline. No attachment to natural hair occurs, making these completely damage-free. Installation takes just 2-3 minutes, and you can remove them instantly.
Cost estimate: Halo extensions cost £40-£120 and last 12+ months, making them excellent value for regular use.
Complete Installation Guide: Step-by-Step Methods
Installing Clip-In Extensions at Home
Clip-in extensions offer the most straightforward DIY installation. Begin with clean, dry hair or lightly blow-dried hair for maximum grip. Brush your hair thoroughly to remove any tangles, then section it into 4-6 horizontal layers from your natural hairline upward.
Step-by-step process:
- Start at the nape of your neck with the lowest, thickest clip-in piece
- Tease a small section of hair with a fine-tooth brush to create texture for grip
- Position the clip just below the teased section, ensuring it sits parallel to the root
- Snap the clip shut firmly—you should hear a distinct click
- Move upward, placing sections 1-2 inches apart across the back and sides of your head
- Finish with lighter clips near the crown and behind the ears
- Blend by curling or straightening your extensions with your natural hair for a unified look
Clip-ins feel most natural when you place them slightly lower than your crown, allowing your natural hair to fall over the attachment points. Many people find 6-8 well-placed pieces create fuller coverage than 12-15 poorly positioned clips.
Applying Tape-In Extensions Professionally and DIY
Tape-in extensions demand precision during application. The adhesive strips create a permanent bond within hours, so incorrect placement becomes difficult to correct. Professional stylists use a tape-in extension applicator to ensure consistent pressure and adhesive contact.
Professional salon application:
- Your stylist sections your hair horizontally from roots to ends
- They place a thin tape-in extension against your root, then sandwich it between two sections of your natural hair
- Using an applicator tool, they press firmly for 10-15 seconds to activate the adhesive
- They repeat this process across your entire head, typically placing 20-30 extensions
- Once all extensions are applied, they blend and style your hair
DIY tape-in installation:
DIY application follows the same principle but requires significant patience. Section your hair into small horizontal rows. Place the tape-in extension against your roots, sandwich it between two hair sections, and press firmly for 15-20 seconds. Many first-timers struggle with achieving consistent tape contact, resulting in extensions that slip after a few weeks. Professionals typically achieve 95% adhesive contact, whilst inexperienced applicators often reach only 70-80%, compromising longevity.
Fusion Extension Application and Professional Requirements
Fusion extensions absolutely require professional application due to the heating equipment and technical skill involved. Attempting fusion extensions at home risks burning your scalp or damaging your natural hair.
Professional application process:
- Your stylist applies a strand-by-strand adhesive or keratin-based bonding agent to pre-taped extension strands
- They take a small section of your natural hair (usually 0.5-1 cm wide) and position it against the bonded extension
- Using a heated fusion iron, they seal the bond by applying controlled heat and pressure
- Each bond cools in 30-60 seconds before moving to the next section
- A full head requires 100-150 individual bonds, taking 2-3 hours total
- The stylist trims and blends the extensions into your natural style
Professional stylists use fusion irons that maintain consistent temperatures between 200-220°C. Home equipment often lacks this precision, risking either insufficient bonding or scalp burns.
Sew-In Installation and Braiding Preparation
Sew-in extensions begin with cornrow braiding, which itself requires skill to prevent traction alopecia (hair loss from tension). Your stylist braids your natural hair into neat, tight rows without creating excessive tension on your hairline.
Professional sew-in process:
- Your stylist cleanses your scalp and hair thoroughly
- They braid your entire head into cornrows, typically creating 5-8 braids depending on desired density
- Using a needle and thread, they stitch the wefted hair extension onto each braid
- Each weft gets multiple stitches (usually 4-6) to ensure security and even weight distribution
- They style and blend the finished sew-in
Proper sew-in technique distributes extension weight across multiple braids, preventing the traction alopecia that results from concentrated tension. Rushed or careless sewing leaves gaps where extensions can slip or create uneven bulges along your braids.
Pre-Installation Preparation: Setting Yourself Up for Success
Your hair’s condition before extension installation significantly impacts both the outcome and how long your extensions last. Damaged, weakened hair struggles to support extension weight, leading to breakage.
Hair Care in the Weeks Before Installation
Begin conditioning treatments 2-3 weeks before your installation appointment. Use a deep conditioning mask twice weekly. Your hair should feel soft, moisturised, and resilient to avoid breakage under extension weight. If your hair has recent heat damage, colour-treated dryness, or previous chemical treatments, allow additional recovery time before installing permanent extensions.
Avoid heavy styling or excessive heat during this preparation period. Your hair needs to be as strong as possible when extensions are attached.
Scalp and Hair Cleansing Before Your Appointment
Wash your hair 1-2 days before your installation appointment. Freshly washed hair often proves too slippery for proper clip or tape grip, whilst day-old hair has sufficient natural oils for optimal adhesion without being visibly greasy. Use a clarifying shampoo to remove product buildup that might interfere with tape or bond adhesion.
For fusion extensions, never apply styling products, conditioner, or oils to your roots on installation day. Residue creates a barrier preventing proper bond formation. For tape-in extensions, ensure your roots are completely dry—moisture prevents tape adhesive activation.

Cost Breakdown: Complete Budget Guide for 2026
Hair extension costs vary dramatically based on installation method, hair quality, and whether you choose professional installation or DIY approaches.
| Method | Material Cost (£) | Installation Cost (£) | Total First Application | Maintenance/Reapplication Every |
|---|---|---|---|---|
| Clip-In | £30-150 | £0 (DIY) | £30-150 | Never (self-applied daily) |
| Tape-In | £80-150 | £200-400 | £280-550 | 6-8 weeks (repositioning £80-120) |
| Fusion | £150-300 | £400-800 | £550-1100 | 12 weeks (removal £150-200, reapplication £400-800) |
| Sew-In | £60-200 | £150-400 | £210-600 | 6-10 weeks (reinstall £150-400) |
| Halo | £40-120 | £0 (DIY) | £40-120 | Never (self-applied daily) |
The most cost-effective option for occasional wear is halo extensions at £40-120 once. For daily wear, clip-in extensions provide excellent value at £30-150 upfront with no ongoing costs. For permanent, seamless results, fusion extensions offer the longest wear time between applications, though they require the largest investment. Budget-conscious customers often choose tape-in extensions as a middle ground: reasonable cost compared to fusion, lasting 6-8 weeks versus clip-ins that need daily application.
Avoiding Common Installation Mistakes
Poor Section Placement
Badly placed extensions create visible bulk, gaps, or unnatural texture. Your clips or bonds should sit in horizontal lines from one ear to the other, roughly 1-2 cm below the roots of each section. Placing extensions too low leaves your natural hair looking thin above the extensions. Placing them too high makes them visible when your hair is pulled back.
Insufficient Hair Preparation
Applying extensions to tangled, damaged, or product-coated hair creates poor adhesion and risks breakage. Spend 10-15 minutes properly preparing your hair rather than rushing into installation. This single step prevents 80% of extension problems.
Inadequate Extension Density
Using too few extensions leaves noticeable gaps and creates a wispy appearance. Using excessive extensions creates weight and tension, potentially causing traction alopecia. Most people achieve optimal fullness with 20-30 pieces of tape-in or 6-8 clip-in sections.
Incorrect Heat Tool Usage
Heat styling your extensions at temperatures above 250°C damages synthetic hair permanently. Even human hair extensions require temperatures below 350°C to prevent fusion and brittleness. Always use a heat protectant spray before styling.
Aftercare: Making Your Extensions Last
Daily Maintenance Routine
Brush your extensions gently twice daily, always working from ends to roots to avoid tension on attachment points. Use a paddle brush or specialized extension brush rather than a fine-tooth comb, which can snag wefts or pull individual bonds.
Wash your hair in cool or lukewarm water, never hot. Hot water loosens adhesive bonds and softens tape. Use sulphate-free shampoo and deep condition your extensions twice weekly. Regular conditioning prevents the dryness that causes breakage and matting.
Sleep and Activity Considerations
Sleep on a silk or satin pillowcase rather than cotton. Silk reduces friction that causes matting and tangling. Consider loose braiding your extensions before bed to prevent overnight tangling. Avoid chlorinated swimming pools, which can bleach and damage extension hair. If you must swim, wet your extensions with fresh water first and apply a conditioner to minimise chlorine absorption.
Extension-Specific Restrictions
Avoid excessive heat styling within the first 48 hours of tape-in or fusion installation, allowing adhesives time to fully cure. Never pull on your extensions aggressively during brushing or styling—this strains both the attachment points and your natural hair.
Troubleshooting Common Installation Problems
Extensions Slipping or Coming Loose
Slipping typically results from insufficient initial adhesion or moisture seeping underneath the attachment. For tape-ins, ensure your hair was completely dry and free of product residue before application. For clip-ins, tease your hair more thoroughly before clipping. Professional repositioning within 2-3 weeks can fix most tape-in slipping issues before extensions fall out completely.
Visible Attachment Points
Visible bonds or clips usually indicate poor section sizing. The natural hair section should be slightly thinner than the extension weft to allow complete coverage. Your stylist may need to reposition extensions lower or use smaller sections to conceal attachment points beneath overlying hair.
Matting and Tangling
Matting occurs from inadequate brushing and conditioning. Brush extensions at least twice daily, focusing on the mid-lengths where tangling begins. Use daily conditioning sprays designed for extensions to maintain moisture and smoothness.
Breakage of Natural Hair
Breakage usually results from extension weight exceeding your natural hair’s capacity or improper installation creating tension. If you’re experiencing breakage, reduce the number of extensions or switch to a lighter installation method. Ensure your natural hair receives intensive conditioning to rebuild strength.
Frequently Asked Questions About Hair Extension Installation
How long does hair extension installation take?
Installation times vary dramatically: clip-in extensions take 5-10 minutes at home, halo extensions require 2-3 minutes, tape-in extensions take 1-2 hours professionally, sew-in extensions take 2-3 hours, and fusion extensions require 2.5-3.5 hours. DIY tape-in installation often takes 3-4 hours due to the learning curve.
Can I install hair extensions myself, or do I need a professional?
Clip-in and halo extensions are designed for DIY application and work well for beginners. Tape-in extensions can be applied at home with patience and careful attention to detail, though professional results typically look superior. Fusion and sew-in extensions absolutely require professional application—attempting these at home risks damaging your natural hair or scalp.
How often do I need to have extensions reapplied or repositioned?
Clip-in and halo extensions are reapplied by you each time you wear them. Tape-in extensions require professional repositioning every 6-8 weeks as your natural hair grows. Fusion extensions last 12 weeks before removal and reapplication. Sew-in extensions last 6-10 weeks before reinstallation. These timelines assume normal hair growth of approximately 0.5 cm per week.
What’s the difference between human hair and synthetic extensions?
Human hair extensions can be heat-styled with straighteners and curling irons, dyed, and bleached like natural hair. They blend more seamlessly and last longer (12-18 months with proper care). Synthetic extensions cost less (£30-80 for a full clip-in set), maintain their style without styling, but cannot be heat-styled and matting occurs more easily. Human hair extensions cost 3-5 times more than synthetic but deliver superior longevity and styling flexibility.
Will hair extensions damage my natural hair?
Properly installed and maintained extensions do not damage healthy hair. Damage occurs from poor installation creating excessive tension, inadequate hair preparation, infrequent maintenance, or wearing extensions too long without removal breaks. Taking 2-4 week breaks between installations, conditioning intensively, and having extensions applied by skilled professionals minimises any damage risk.
Moving Forward With Your Hair Extension Journey
Understanding how to put in hair extensions transforms what many consider an intimidating process into a manageable investment in your appearance. Whether you select clip-in extensions for flexibility, fusion for permanence, or halo styles for damage-free convenience, the right method depends on your lifestyle, budget, and styling preferences. Start with a consultation if choosing professional installation, ensure thorough hair preparation regardless of method, and commit to proper aftercare to maximise your investment. Your extensions will repay this attention with fuller, longer hair that transforms your confidence and styling options for months to come.